Can an Autocad Drawing Produce Code
In this post I want to introduce a module available in Python for automatizing the creation of drawings in AutoCAD. The module is called pyautocad. It is supported by pip install for easy installation. The pyautocad module will also allow you to adjust existing drawings, by e.g. manipulating objects in the drawing.
In a previous post I have already introduced AutoCAD basics and various AutoCAD commands. For example I have introduced AutoCAD LINE, AutoCAD MLINE, AutoCAD PLINE, AutoCAD XLINE, AutoCAD CIRCLE, AutoCAD RECTANG, AutoCAD OFFSET and many more. A full overview is provided under the AutoCAD tab of this blog, or as part of my AutoCAD tutorials.
pyautocad recognizes the AutoCAD drawing currently open and it also recognizes the currently active model space. Before running the Python code below I therefore open a new AutoCAD drawing.
I then import pyautocad. I create an AutoCAD instance using pyautocad.
# importing pyautocad import pyautocad # creating AutoCAD instance acad = pyautocad.Autocad()
Let us check that the module really recognizes the currently active AutoCAD drawing:
# print name of document currently recognized as being active in AutoCAD print(acad.doc.Name)
Drawing1.dwg
Next, I can e.g. create a circle in 2D plane. In other posts we also demonstrate how to add pyautocad polylines, pyautocad arcs, a pyautocad ellipse, pyautocad splines, pyautocad helices, pyautocad texts and pyautocad solid objects. We also wrote posts demonstrating e.g. polar arrays in pyautocad and rectangular arrays in pyautocad.
# specify x and y coordinates of circle center point from pyautocad import APoint point1 = APoint(100.0,100.0) # x and y coordinates of points # add circle to drawing circle1 = acad.model.AddCircle(point1,100)
The following circle has been added to my AutoCAD drawing:

The change in color of the circle is possible with pyautocad too. I do so in the code below:
# change color of circle to red circle1.Color = 10 # 10 is a red color
The result in my drawing when executing the Python code looks like this:

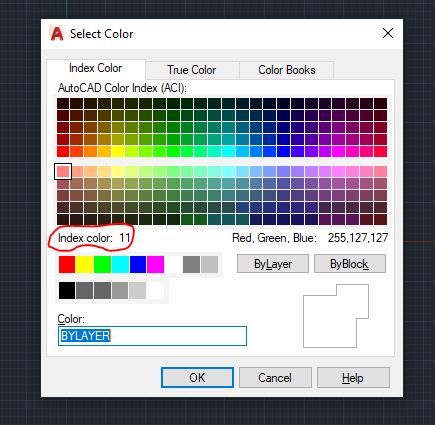
The color index numbers can be found in AutoCAD. See screenshot below.
I can also check other current property values for the circle I just added to the drawing. Below are some examples:
# check layer assignment print("current layer: " + str(circle1.Layer)) # check current linetype print("current linetype: " + str(circle1.Linetype)) # check linetype scale print("current linetype scale: " + str(circle1.LinetypeScale)) # check current line weight print("current line weight: " + str(circle1.Lineweight)) # check current thickness print("current thickness: " + str(circle1.Thickness)) # check current material print("current material:" + str(circle1.Material)) current layer: 0 current linetype: ByLayer current linetype scale: 1.0 current line weight: -1 current thickness: 0.0 current material:ByLayer
I can use the AutoCAD PROPERTIES command in AutoCAD to get an understanding of the property attrbitutes that an object can have:

I can use the property attributes of e.g. the circle object to make adjustments. For example I have the layer "circles" which I want to assign the circle to. I can do this using pyautocad:
circle1.Layer = "circles"
I could now also adjust the color setting for the circle object, such that the color is specified by the layer – the index for this is the color index number 256:
circle1.Color = 256
Below you see the result in AutoCAD:

I now create two additional circles inside my drawing, using pyautocad. Afterwards I use pyautocad iter_objects method to loop through all objects in the drawing, demonstrating the option of doing so if needed:
# adding two circles to drawing circle2 = acad.model.AddCircle(APoint(200.0,200.0),100) circle3 = acad.model.AddCircle(APoint(300.0,300.0),100) # looping through all objects for obj in acad.iter_objects(): print(obj)
<POINTER(IAcadCircle) ptr=0x223f8ed65f8 at 223faa5c848> <POINTER(IAcadCircle) ptr=0x223f8ed6358 at 223faa5ca48> <POINTER(IAcadCircle) ptr=0x223f89ede28 at 223faa5c148>
This is what the result looks like in my AutoCAD drawing:

This completes my introduction to working with AutoCAD in Python, using pyautocad. To get a better understanding of AutoCAD I refer to my other AutoCAD trainings and recommend checking the pyautocad documentation.
In other posts we also demonstrate how to implement and execute operations in pyautocad, as well as we e.g. demonstrate how to mirror objects in pyautocad.

Data scientist focusing on simulation, optimization and modeling in R, SQL, VBA and Python
Source: https://www.supplychaindataanalytics.com/python-for-autocad-pyautocad-module/
0 Response to "Can an Autocad Drawing Produce Code"
Postar um comentário